How to DIY Farmhouse Crown Molding
This DIY Farmhouse Crown Molding is made with simple pine boards, and a few easy steps. The character it adds to the room is priceless!

If you’ve been around for a little bit, you may remember we built an addition on to the back of our house in 2016. (You can check out this previous post about Eli’s Bathroom here)This little addition included a mud room, and a second bathroom which this big old farmhouse desperately needed. We recently FINISHED the addition, and the crowning jewel is definitely this DIY Farmhouse Crown Molding.
Want to see how we Diy-ed the board and batten? Check that out below!
Our house was built in the 1890s. It was updated several times throughout the years, but majorly renovated in the 1980s. The whole farmhouse was basically voided of all its original character. Except for the ceilings on both porches. They were left the original bead board. I love them. I often dream of ripping out drywall, and subflooring and getting the whole house back to its former glory. My husband doesn’t share that romantic notion.
When we built in the back porch to make the mudroom and bathroom, I KNEW that I would absolutely keep the beadboard ceiling. We went back and forth for YEARS (literally, that’s not at all dramatic lol) with what to do with crown molding. I knew I didn’t want factory made moldings, and I couldn’t find anything I really loved anyways. One day I had a light bulb moment. You know the ones, where the exact thing you’ve always wanted just pops in your head. It was easy, and budget friendly. My two favorite things.
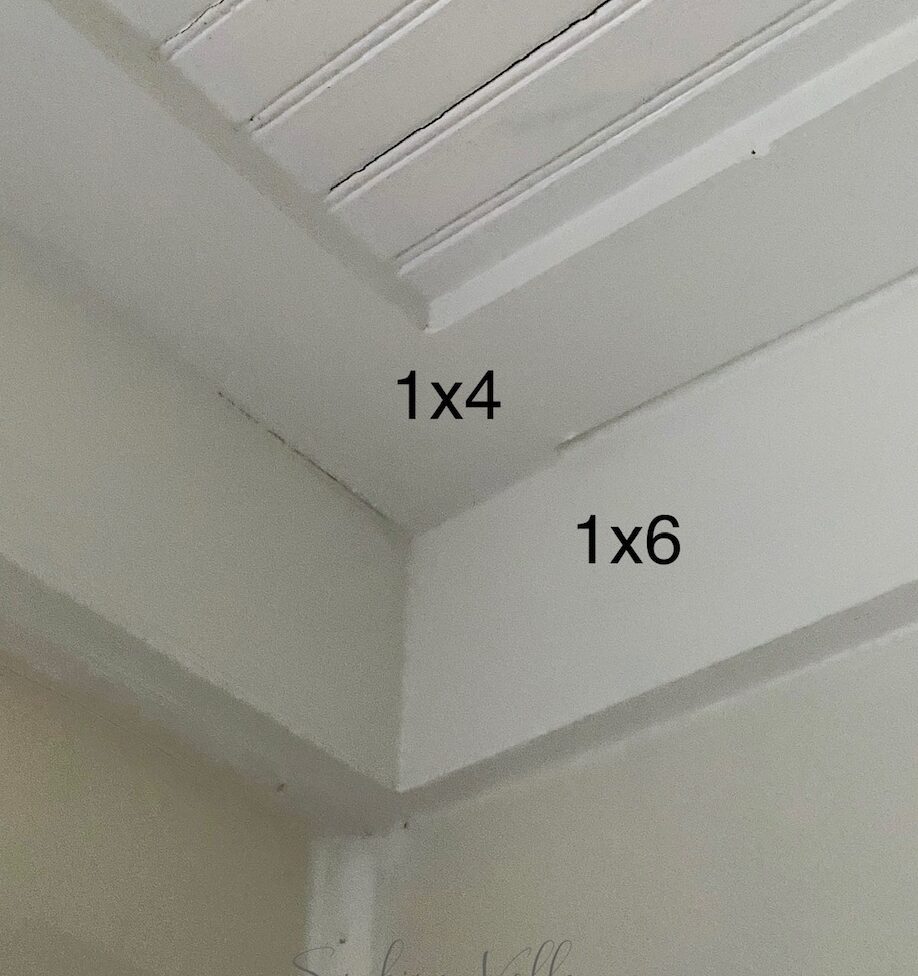
I took a piece of 1 x 6, and a 1 x 4, and held them up to the ceiling, and thus DIY Farmhouse Crown Molding was born.
This post may contain affiliate links. Which means I may make a small commission at no additional cost to you. For my full disclosure click here.


How we did it…
- The first step is to measure each wall in your room to know exactly how long you’ll need each board to be. We had a few corners and crevices to measure around and cut boards for. It made the project a little more time consuming, but if you live in a old house you know that’s just par for the course.
- Secondly, you’ll want to cut your boards, or take your measurements to the hardware store when you buy you’re lumber and have them make your cuts. This saves a lot of time and cleanup, but like anything it does come at a cost. Nick used a table saw to make all of our cuts. We decided against mitering the corners. We just made flat cuts, and joined the boards up square. It was perfect when we caulked and painted.
- The third step is to a lay your 1×6 on the wall and all the way up to meet the ceiling. You may need an extra set of hands to steady the board as you nail the board up. Next, take your cut 1×4 and lay it flat on the ceiling joining up against the 1×6. Attach with nails to the ceiling
- Now it’s time to caulk the seams. This step makes all the difference. Be sure to caulk all of the nooks and crannies so when you apply the paint the boards appear as seamless.
- Prime and paint, or stain, and enjoy your beautiful DIY Farmhouse Crown Molding.

One thing I love about doing these DIY projects is being able to customize them exactly the way we want. We did this same type of crown molding in the mud room, but used smaller boards. We used a 1×4 on the wall, and a 1×3 on the ceiling. It turned out just as nice, and worked perfectly in there.

DIY Farmhouse Crown Molding
Equipment
- 1×6 boards
- table saw
- 1×4 boards
- paneling nails
- hammer
- caulk
- primer, paint (or stain)
Instructions
- The first step is to measure each wall in your room to know exactly how long you’ll need each board to be. We had a few corners and crevices to measure around and cut boards for. It made the project a little more time consuming, but if you live in an old house, you know that’s just par for the course.
- Secondly, you’ll want to cut your boards or take your measurements to the hardware store when you buy your lumber and have them make your cuts. This saves a lot of time and cleanup, but like anything it does come at a cost. Nick used a table saw to make all of our cuts. We decided against mitering the corners. We just made flat cuts and joined the boards up square. It was perfect when we caulked and painted.
- The third step is to a lay your 1×6 on the wall and all the way up to meet the ceiling. You may need an extra set of hands to steady the board as you nail the board up. Next, take your cut 1×4 and lay it flat on the ceiling joining up against the 1×6. Attach with nails to the ceiling
- Now it’s time to caulk the seams. This step makes all the difference. Be sure to caulk all of the nooks and crannies so when you apply the paint the boards appear as seamless.
- Prime and paint, or stain, and enjoy your beautiful DIY Farmhouse Crown Molding.
This has been our best DIY project yet!
I love DIY projects. This is our biggest DIY project yet. (Except for the time we built a barn) It has taken us four and a half years to complete. I am SO happy to report that we are still completely debt free with that project, and we did every single little bit of work all by ourselves. It’s rewarding to know we met our goal. Even if it did take nearly 5 years.
I’d love to hear about your DIY projects. Tell me below. As always, thanks for spending a tiny part of your day with me.

Here’s an image to pin for later…


When we moved into our new house we had 1 room unfinished. It was block on 1 wall and drywall on 3. It looked like sage had painted it because it was only partially covered. The floor was concrete. It was the room that was going to have the hunting clothes so what did it really matter. Well, the project began when the local furniture store was having a clearance sidewalk sale. They had 2 carpet sample display racks with 3 tiers of curtain rods. They were about 5 feet long and about 8 feet tall. They were asking $5 each…yep, $5. So I of course thought that they were perfect for that room. Travis had to cut off the top decorative board, which became a coffee bar shelf btw. Then we decided ok let’s just fix up the room while we are at it. A gallon of kilz paint for the block wall and a quart for the rest. Amazing difference. Now that floor. I remembered that they had scrap linoleum at the sidewalk sale. Took a little sorting to find the matching pieces but $20 we had a new floor. With paint and glue and everything we had a new room and spent less than $100.