How to Update a Master Bathroom On a Small Budget
I recently finished our master bathroom update, and transformed the space for less than $200! I am so excited to share it with you!
This post may contain affiliate links. Which means I may make a small commission at no additional cost to you. For my full disclosure click here.


This is a post I’ve been SO EXCITED TO WRITE! I FINALLY finished our master bathroom update. It’s been three years since I’ve been dreaming of repainting, and refreshing our little master bathroom. I am SO happy that I was able to pull it off fairly quickly, and for less than $200! To refresh your mind a little on what the bathroom used to look like, you can read my post .Farmhouse Master Bathroom Refresh – Part 1 The Inspiration
I have never loved the flooring choice that the previous owners used…in the WHOLE house. I’ve tried several things to make it feel less “warm”, but I haven’t succeeded. Turns out if you put cool colors with it, it just looks more warm. So, I decided instead of working AGAINST it, I’d work WITH it.
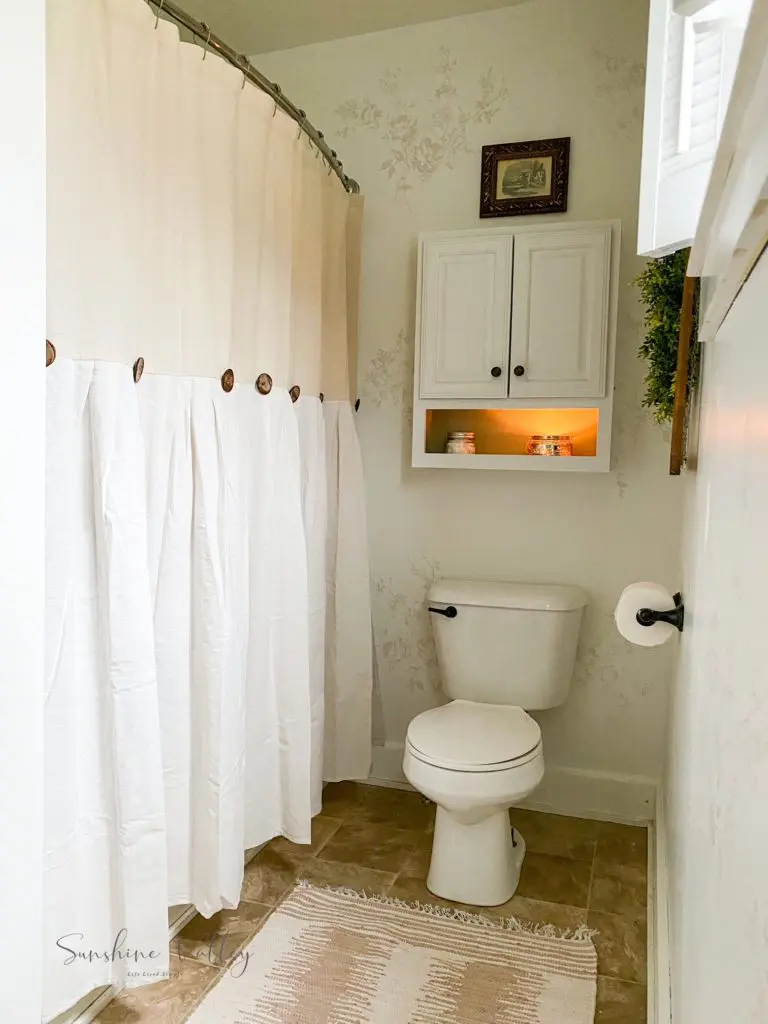
To keep costs down, I have basically DIYed everything I could. I painted the walls white. Once the white was dry, I did an elegant floral stencil in varying sizes all over. I used a floral stencil from Designer Stencils, and I really love the way it turned out. It is so subtle, but adds so much elegance to the space.


For the stencil color I used a 50/50 mix of bright white paint, and Ashen Tan from the Foyer Makeover. I had planned to use a white wall with an antique white stencil over top. When I initially tried it, the antique white didn’t show up well. It honestly ended up looking like a water stain on the wall. I lightened the ashen tan up, and it ended up being the perfect color!

I continued the Ashen Tan on the vanity, and I am so pleased with it. As I was painting, I was tempted to continue the color on to the baseboards, but I decided to leave them white…for now… Don’t be surprised if you see a post about painting baseboards sometime in the future. ha!
We hope to replace the vanity soon!
I really didn’t have to change much else with the vanity. We upgraded the faucet, and mirror several years ago, and I’m still very pleased with them. I would LOVE to have double sinks, though. That is something that is on the list of projects for 2021. For this little update though, we decided it would be best to keep the cost down (especially since I did it at Christmas), and paint the existing cabinet. Hopefully one day in the not so distant future I will be typing the post “We finally got double sinks”!


I had fun DIYing several of the accents I used in this space. Hopefully, I plan to write a post soon with how I made the farmhouse towel rack, and the DIY hobnail planter for the sink. I had SO much fun creating these things. They were easier than you’d think, too!
A FREE vintage inspired printable!


Another little creation of mine is this vintage inspired cow sketch. It’s been added it to the Member’s Only Library for your printing pleasure. The print adds a hint of vintage charm that I love, and the bonus, it was FREE. I printed it off on some tan colored cardstock, and put it in a frame I’ve had for years.

This vintage goat print is an Etsy shop find. It is actually what inspired me to create the vintage cow sketch above. It is actually a page from a French Encyclopedia from the 1800s! I love the character and charm it adds.


What’s a bathroom refresh without a new shower curtain and rug? I found both of these beauties on Amazon! I love the bit of whimsy the shower curtain adds, and the texture in the rug. It feels like I searched high and low for a 100% cotton throw rug that I could toss in the washing machine. I love rugs, but if I can’t wash them, they’re just not practical for us. Obviously since it’s cotton I’ll have to be very careful drying it, but overall, I am very pleased with it!
A few tips for updating your bathroom on a budget:
- Utilize the power of paint! Our vanity is the perfect example. I am dreaming of a new cabinet one day, but painting it gave it an instant facelift.
- DIY what you can! Accessories can get pricey. DIYing is a good option if you’re pinching pennies. For just a few dollars, I made a farmhouse style towel rack. If I were to have purchased it they were about $20! Every little bit saved helps!
- Shop around! Do a simple search of the product you’re looking for. Many times I will find the exact product I want, and even a few dollars cheaper than I had expected to pay!
- Don’t settle. I know this makes NO sense, BUT hear me out. If you’re always settling on something because it’s cheaper, you’re probably going to end up changing it sooner than you would’ve had you spent a few dollars more and got what you REALLY wanted. This is a lesson I have learned from experience…over and over and over…I love the way our bathroom feels now, and even though I paid more for the shower curtain than I normally would have, I love it. I guarantee you I will keep it longer than one I had settled for.
Other than the vanity, the bathroom is finished, and I am so happy with the way it turned out. It’s even better knowing that I didn’t break the bank to give it this little update. I am also very pleased to get it marked off on the 2020 project list…especially since we’re just a few days away from 2021! I am so excited to share some of the goals and plans I have tentatively made for next year, and hear if you’ve got any fun plans!
As always, thanks for spending a little part of your day with me!


I did a minor makeover to my bathroom too. Very pleased with my end result. I’ll try to post pictures soon
I’m so sorry I’m just seeing this comment!! I can’t wait to see how your bathroom turned out! ❤️
This turned out so pretty Amanda, I love the delicate look of this.
Thank you so much!!